Sitemaps are one of SEO’s oldies but goodies.
In fact, they’re one of the most important elements of SEO, because they help Google and other search engines find the pages on your website.
Not to mention they also help you rank better, because Google is able to locate new pages and identify updates to old pages much more quickly.
In a nutshell: you can’t live without ’em.
I’ve often heard that they can feel overwhelming and quite technical to understand.
But don’t let the frustration of their technicality make you throw your computer out the window — I’ve got your back!
I will show you what sitemaps are, how to create one, how to submit them to Google, and all the essential best practices.
What is a sitemap?
To start off with the basics, a sitemap is a file that provides information about the pages, videos, images, and other files on your website. It’s important for various reasons, including:
- Acting as a roadmap for Google and other search engines to find and better understand your content.
- Leading search engines through your website to crawl and index the essential pages.
- Helping search identify when new pages and updates to old pages are available.
- Helping search engines find alternate language versions of your page.
But before I go further, you must know that there are two types of sitemap formats: HTML and XML. Here’s the basic difference:
HTML sitemaps: This is more like your content sitemap that users can see and use to navigate your site. They’re also commonly referred to as your “website archive.” Some marketers view HTML sitemaps as outdated or even entirely unnecessary.
XML sitemaps: This is the sitemap that’s purely used for indexing and crawling your website and is manually submitted. It’s the more modern form of handling how all your content is stored across your website.
While HTML sitemaps might help users find pages on your site, as John Mueller said, your internal linking should take care of that anyways. So the focus from an SEO perspective should be on XML sitemaps.
Types of Sitemaps
From these two types of sitemaps described above, there are also subsections within them. I’ll now go over these in more detail.
1. Page Sitemap
A page sitemap or regular sitemap improves the indexations of pages and posts. For sites that are not image-focused or video-focused, like photography and videography sites, a page sitemap can also include the images and videos on each page.
A page sitemap without an image would look like this:
<?xml version=”1.0″ encoding=”utf-8″?>
<urlset xmlns=”http://www.sitemaps.org/schemas/sitemap/0.9″ >
<url>
<loc>https://example.com/</loc>
<lastmod>2020-09-17</lastmod>
<changefreq>daily</changefreq>
<priority>0.9</priority>
</url>
</urlset>
Include your URLs in <loc> tags. <lastmod> indicates when the page was last edited. <changefreq> indicates how often the page is edited and <priority> indicates how important the page is to other pages on the website as a whole. You can take a look at Sitemaps XML format for more information on these parameters.
2. Video Sitemap
An XML video sitemap is similar to a page sitemap, but of course focuses largely on video content, which means they are only necessary if videos are critical to your business. If they aren’t, save your crawl budget (the finite amount of crawlable pages and resources across your site) and add the video link to your page sitemap.
But if you do need a video sitemap, it would look like this:

Note: This is what a video sitemap looks like. Implement it only if videos are critical to your business.
3. News Sitemap
If you publish news and want to get those news articles featured on top stories and Google News, you need a news sitemap. There’s a crucial rule here: do not include articles that were published longer than the last two days in the file.
Google News sitemaps aren’t favored in regular ranking results, so make sure you only add news articles. Also, they do not support image links, so Google recommends you use structured data to specify your article thumbnail.
4. Image Sitemap
Like the video sitemaps, image sitemaps are only necessary if images are critical to your business, such as a photography or stock photo site. If they aren’t, you can leave them in your page sitemap and mark them up with the image object schema, and they will be crawled along with the page content/URL.
If you believe an image sitemap is needed, it will look like this:
<?xml version=”1.0″ encoding=”utf-8″?>
<urlset xmlns=”http://www.sitemaps.org/schemas/sitemap/0.9″ xmlns:image=”http://www.google.com/schemas/sitemap-image/1.1″ >
<url>
<loc>https://example.com/</loc>
<image:image>
<image:loc>https://example.com/image-url.png</image:loc>
</image:image>
<image:image>
<image:loc>https://example.com/second-image-url.png</image:loc>
</image:image>
</url>
</urlset>
5. Sitemap Index
There are a few limitations you’ll want to keep in mind for sitemaps:
- Having too many URLs will only lead to no indexation of some of your pages.
- All sitemaps, except the news sitemap, should have a maximum of 50,000 URLs.
- News sitemaps should have a maximum of 1000 URLs.
- A sitemap should be a maximum of 50MB in uncompressed file size.
As a result of those limitations, you might need to have more than one sitemap. When you use more than one sitemap file, you need an index file that lists all of those sitemaps. It’s the index file that you submit in Google Search Console and Bing Webmaster Tools. That file should look like this:

Build a Sitemap With HubSpot’s Free CMS
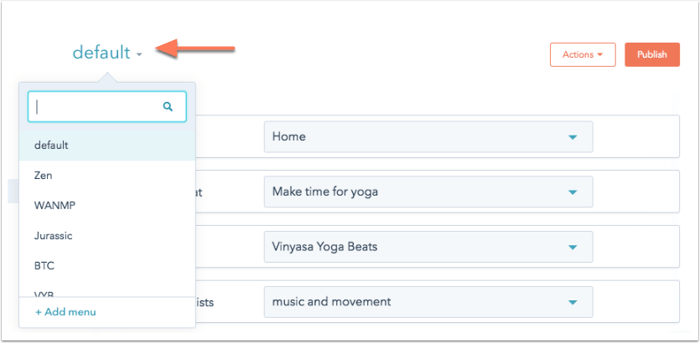
You can easily make a sitemap using HubSpot’s free CMS. After building your sitemap, you can easily make edits as needed.

Image Source: HubSpot
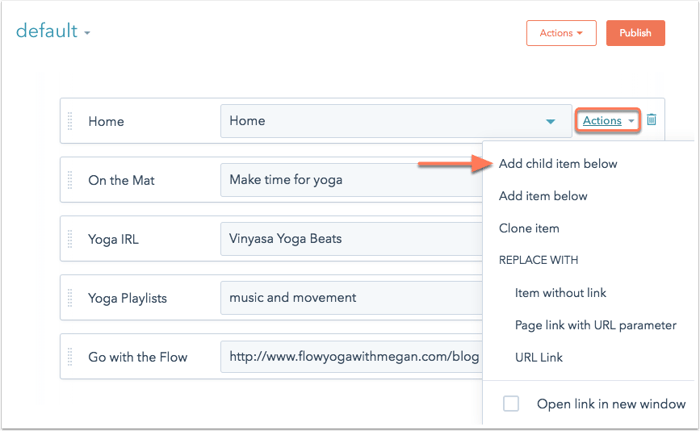
- Add child pages to a menu

Image Source: HubSpot
- Create a secondary menu

Image Source: HubSpot
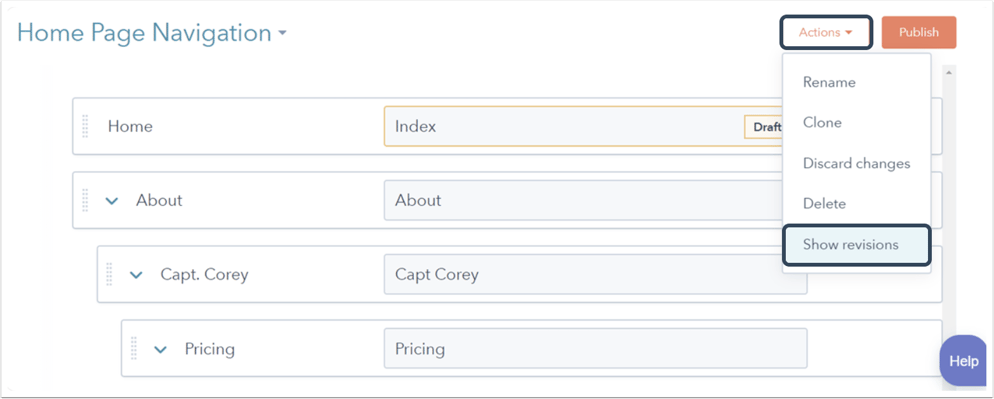
- View revisions to your menu

Image Source: HubSpot
For more information, visit this how-to guide.
XML Sitemap Example
So far, you have seen each sitemap’s structure. Most websites will only need the page sitemap that includes the images on each page. That looks like this:

Sitemap Priorities
Adding priorities to your sitemap is one of the things many people do to differentiate between how important different pages are, but Google’s Gary Illyes mentioned that Google ignores these priorities. In his exact words:

Generally speaking, as long as you are honest about when your content was actually modified, include it in your sitemap so that Google and other search engines know to re-crawl the modified page and index the new content.
How to Create a Sitemap
In this section, I will show you how to create a sitemap without using any generator or plugin. If your website is on WordPress or you’d rather use a generator (which makes this easy), skip to the next section.
These are the exact steps to follow to create a sitemap manually:
1. Decide which pages on your site should be crawled by Google, and determine the canonical version of each page.
Canonical versions are necessary when you have duplicate pages. For example, suppose you serve an international community and have pages for each location with the same language and content, like example.com/us/page and example.com/ca/page for US and Canada visitors, respectively.
In that case, it’s important that you point to the original, which might be example.com/page or one of the two as the canonical. If you’d like to learn more about how this works, this post explains canonicalization in depth.
Furthermore, do not include URLs that are blocked by robots.txt files, require a login to access, or are password-protected, as search bots can’t crawl them. You’ll only get coverage errors in GSC if you add them.
2. Determine if you need more than one sitemap.
Several websites use separate files for pages, posts, and categories. Remember that if you have more than 50,000 URLs, you need multiple sitemaps.
3. Code all your URLs in XML tags to look like the type of sitemap you want to create.
This page explains how to use XML tags in further detail.
4. If you have multiple sitemap files, create a sitemap index file and include the links to the individual sitemaps you created.
This one is already described in the section titled “Sitemap Index”.
Sitemap Generators
Most of us marketers do not have a web development background, so we can’t code to save our lives. If the thought of manually crafting a sitemap gives you a headache, use a sitemap generator and save yourself 12 days of looking through complex coding.
There are several sitemap generators that you can use:
- TechnicalSEO by Merkle has one where you can upload a CSV file with your URLs. It’s especially great if you have different language versions of your pages (hreflang tags).If your website is custom-coded and is not on any CMS or builder that generates a sitemap, you need to use a generator like TechnicalSEO.
- Screaming Frog SEO Spider also has one that I like to use with simple custom-built sites. In Screaming Frog, ensure you are using the spider mode. You can do that by clicking on “Mode” and selecting “spider”. Then type the URL of your home page and let it crawl. When it’s done, click on “Sitemaps.”
For clarification on how to use Screaming Frog, take a look at the image below:

In order to save the XML file to your computer, tick all the options that matter to your site and click on “export”. Then, upload that file to your server in the root directory.
Both tools do not automatically update the sitemap file. Some tools do but are premium, so you pay for the service.
However, you won’t need to deal with any of the above if your website is on WordPress or an ecommerce platform like Shopify.
For WordPress sites, Yoast and Rank Math are popular SEO plugins that generate sitemaps and update them when you edit your posts and pages and Shopify even generates sitemaps automatically.
How to Submit Your Sitemap to Google
The best way to submit your sitemap to Google is through Google Search Console (GSC). There are other ways and additional steps as well, but I will start with GSC, because it’s the most common method.
Follow these steps:
1. Go to Google Search Console and click on “sitemap.”
2. Type your sitemap URL and click Submit. If you have multiple sitemaps with a sitemap index file, you only need to type the URL for the index file.
As an alternative, if you haven’t submitted it to GSC, there is another way to let Google know you have one by adding this line in your robots.txt:
Sitemap: http://example.com/sitemap.xml
But of course the URL here with the one you actually have. And if you have an index file, include only your index file here.
If (for some weird reason) you aren’t using GSC, use the ping service to let Google know it should crawl your file. To do that, type the URL below in your browser:
http://www.google.com/ping?sitemap=https://example.com/sitemap.xml
Replace https://example.com/sitemap.xml with your sitemap URL.
And it’s done!
Sitemap Best Practices
Now that you understand the importance of sitemaps, how they work, and your options for submitting them, let’s make sure the final one you create is in tip-top shape by following these best practices.
1. Use tools to generate automatic sitemaps.
Manually creating and updating an XML sitemap will cost you a lot of time (and is unnecessarily complex). To save time so you can focus on other things like your next Netflix binge, it’s best to use an automatic sitemap generator.
The ones mentioned for WordPress above come with that feature for free. For custom-built sites, you will have to pay, but in my opinion it’s absolutely something worth paying for.
2. Do regular sitemap maintenance checks and updates.
All parts of SEO are an ongoing effort, so check your sitemaps regularly. Search console does an excellent job of letting you know if your submitted URLs have issues with crawling or indexing.
Check the ‘Coverage’ section in GSC regularly and update your site or sitemap when there are errors. The great thing about this is that it tells you what the exact error is with suggestions on how to fix it.
You can also use Screaming Frog for sitemap maintenance. After crawling your website or sitemap URL, check the response code tab for 404 or 5xx errors.
If you are using an automatic sitemap generator tool or plugin, update it when updates are available. Furthermore, periodically view the sitemap by going to your sitemap URL and checking if any page is missing or the last updated time is incorrect.
3. Prioritize high-quality pages in your sitemap.
Although Google no longer pays attention to the priority tag (or so they say), you can still add it because there’s more than Google out there (yes, as an SEO I will admit it). Bing might pay attention to that tag, so it’s still good practice to prioritize high-quality pages in your sitemap.
Sitemap priority shows which pages to crawl and index faster, so you can set priorities using values ranging from 0.00 to 1.00. But make sure not to use the same value for all pages or else Google won’t be able to tell which is most important.
For values, you can go with something like this:
- Homepage – 1.00
- Main landing pages – 0.90
- Other landing pages – 0.85
- Main links on navigation bar – 0.80
- Other pages on site – 0.75
- Top articles/blog posts like hub pages – 0.80
- Blog category pages – 0.75
- Other posts – 0.64
4. Include only canonical versions of URLs in your sitemap.
Your sitemap should only contain URLs that you want search engines to index. That means if a URL points to another as its canonical version, you shouldn’t include it, as it’s a statement to Google and other search engines that you don’t wish for that URL to be indexed.
Ignoring that and including that URL in your sitemap provides conflicting information to Google. The unintended URL might get indexed, or you will get coverage errors in GSC. So, only include the canonical versions, so you can consolidate your position in search engine results.
5. Split up your large sitemaps.
I mentioned this above already that you need to split your sitemap into multiple files if it exceeds 50MB or has more than 50,000 URLs. Never submit large XML files to Google, otherwise some of your URLs will not be indexed – and you know well that every URL matters!
One quick tip here is to save each file with easy to understand names (for you) like page_sitemap1.xml and page_sitemap2.xml.
And with that, I wish you happy sitemapping!
![→ Download Now: SEO Starter Pack [Free Kit]](https://no-cache.hubspot.com/cta/default/53/1d7211ac-7b1b-4405-b940-54b8acedb26e.png)


